Deployment Pipeline
Adding a deployment pipeline that includes automated unit tests and scheduled deployment to production.
Required Modules
Note: Downloading private app store modules/widgets has been turned off at the moment for certain versions due to security concerns. The latest version of private App Store content can still be downloaded from the Company Content page in the Mendix App Store and then imported into the respective versions of Studio Pro/Desktop Modeler. Once the module is downloaded, import it by right clicking Project File and clicking on Import module package.

Getting Started
Here we'll go through the process of quickly adding the pipeline module to your own application so you can easily deploy from a local environment to acceptance, and from acceptance to production.
Module Dependencies
In order to use this module, you'll need to download a few more modules from the Mendix app store in order for this to work:
- Community Commons
- Unit Testing
- Long Running Task Updates Module (BYU Private App Store)
Set Up
Place deploy button
First, you'll want to place the deploy button in your application somewhere, usually a system settings page. This button is found in the "_USE ME" folder of the module folder, and it's the snippet "PipelineButton." To use it, go to the page where you wish to put the button, and drag a "Snippet Call" widget to the place you wish to put the button.

Then you'll want to select the snippet mentioned above.

Then you should have the button on your page.

User Roles
In order to deploy, the user must have the "Pipeline.Admin" role. You can add this role by going to your project settings, and under the tab "User Roles," you'll be able to add the "Pipeline.Admin" role to the user's application role.
Constants and Scheduled Events
Important note for creating users with API rights: It is highly recommended that you use a separate account for each application using the Deploy API. If you have one account that has API Rights and Transport Rights to all of your applications, then if an API Key gets leaked for that account, a person can have access to the Deploy API for all of your applications.
Lastly, there are a few constants that need to be changed. In the local environment, you'll need to find these constants in the project explorer. The constants that need to be changed are:
- You will need to make sure that the Unit Testing module is set up. This includes running the startup microflow found under "UnitTesting > _USE ME > Microflows > Startup" in the after startup microflow. This can be set in your project settings.
- "UnitTesting > CONFIG > RemoteApiEnabled" set default value to "true"
- "Pipeline > _USE ME > Mendix API":
- AppId must be set to your application's id. To find this, look at your production environment url, and it should be the first part of the url after "https://" It should look something like "byu-github" or "byu-mylink".
- Username must be the username for a user that has rights to the Deploy API for this application. These are rights that have to be explicitly granted by the technical contact of the application.
- Key is an API Key associated with that user. These are generated in that user's user settings.
If you want to deploy to production, you'll need to set a few constants in the acceptance environment. To do this, you must go to your application's settings in the Mendix developer portal, and go to the environments page by clicking the link on the left side of your application's settings.

Then click the details button for your acceptance environment.

Then go to the "Model Options" tab.

Here you will see various constants and scheduled events that you can change. In order to deploy to production from acceptance, you will need to do the following:
- Make sure that the scheduled event Pipeline.CheckScheduledDeployment is enabled.
- Set the constant UnitTesting.RemoteApiEnabled to true.
- Set the constant Pipeline.AppId to the application id of your application.
- Set the constant Pipeline.Environment_Name to 'Acceptance'
- Set the constant Pipeline.Key to the API key of the user with API rights.
- Set the constant Pipeline.Username to the username of the user with API rights.
You will also need to set a constant in the production environment. Go to the details of your production environment, then to "Model Options," and make sure that Pipeline.Environment_Name is set to 'Production'. Then you are all set up to use the pipeline.
Note: You may not have access to the environment details page. If this is the case, make sure to talk to one of the administrators, or those with the role "SCRUM Master," and see if they can help you with this.
Usage
Using the pipeline is quite simple. In the local environment, you'll be presented with the following button:

Clicking this button will grab the most recent commit on the main line, and take all the steps necessary to deploy it to acceptance. You will also be shown the following screen:

This means that deployment is in progress. Make sure not to shut down your server until it is done running.
Then when deploying from acceptance to production, you have the following button:

When hitting this button, it will do all the same things that deploying to acceptance does, but instead of immediately deploying to production, it will schedule the deployment for midnight the next day. So when that is complete, you'll have the following screen:

Unfortunately, the button doesn't refresh itself after this is done, because of the nature of how progress gets updated in this screen. If you refresh the page you're on, you'll see that the button has changed:

If you click on this button again, you can cancel the deployment.
This will go over the process of how to create a non-person person that will use the API in our separate applications. This is to avoid problems we would get from having someone's API credentials leaked, and then having someone else use the deploy API with their credentials. This way, risk is a little more mitigated.
Create a BYU Email Alias
There may need to be a discussion of who manages these, since at least students have a limit on how many email aliases they can have.
To create an alias, go to myBYU, and under the Communications section under Campus Links, there should be a link that says "E-mail Alias Manager." Click that link, and then create a new alias. This will be the email for the new non-person person. Make sure that the email goes to someone who is on the application's team, preferably the technical contact, or someone who'll be in charge of the pipeline.
Invite the Non-person Person
You invite the non-person the same way you invite anyone to an application. In the developer portal, go to the application you wish to invite the API user to. To do this, go to sprintr.home.mendix.com/index.html, and then once you've signed in, click Apps on the top part of the screen. You'll see a screen like this:

Then click the application you wish to invite the non-person to, and then click "Team" in the left part of the page.

You'll see a list of all the people on the team. Now go to the top right corner, and there should be a button that says "Invite Member."

Click that button, and then you'll see this screen:

Enter the email address for the non-person, or in other words the alias you just created, and click "Add to invitee list." Give the user the role "Business Engineer," and then click "Next." The next part is adding a personal message. This won't matter, click next. Then confirm that all the information is correct, and click "Send Invitiations."
Once that's done, an email will be sent to that alias you created, and someone will need to accept the invitation to the application. This will be whoever the alias is pointing to. When that person accepts the invitation, they will also need to fill out some information for the API User, since it will be a full fledged Mendix member. Give them a name that's something like "<Application Name> API User," and then give them a password. I would recommend using Lastpass, and generating a 32-character random string for the password, and then making sure that everyone who needs access to this user has that password as well.
This will add the user to the application and to the company.
Generating an API Key
Now you'll need to sign in as the non-person person, and generate an API key for that user. Once you're logged in, go to the profile of that user. Then click the cog wheel in the bottom right corner of the top box:

Then on the left side click "API Keys":

Once there, click "Create new API Key." It will ask you to give the key a description
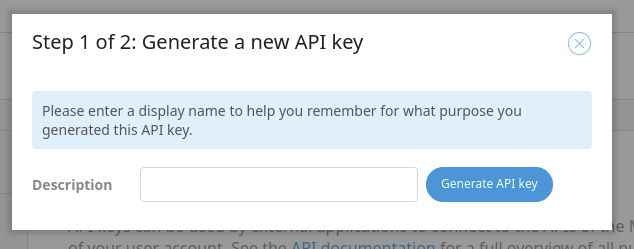
Once you have that, it will show you the API Key it generated. Keep in mind, it will only show you this once. Make sure to store it in a safe location, such as with the credentials of the user in Lastpass, or maybe in its own secure note there.

Grant API Rights
For this, you will need to make sure to contact the technical contact. Only the technical contact can give API rights to a user within the application. To grant API rights, the technical contact will need to go to the application in the developer portal, and then click Security on the left hand side of the page.

From here, they need to click on the "Node Permissions" tab.

Then they should see a grid of checkboxes that are associated with the various users in the application. The technical contact should then make sure that the API user has "API Rights" and "Transport Rights" granted to them. Do this by checking the appropriate box for the API user.
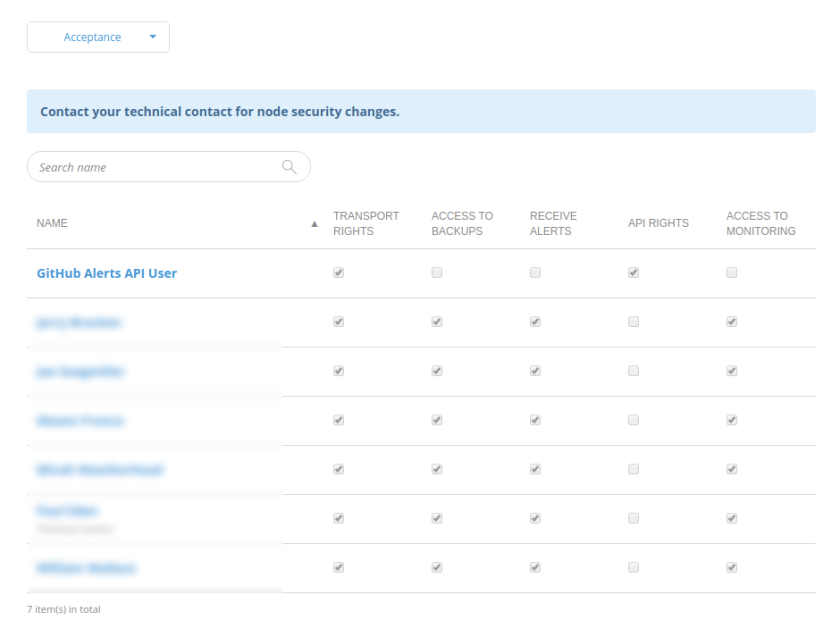
Once that's granted, the API user can use the API, and then you can follow the process in the quick start guide for setting up the Pipeline. Note that you will have to grant API rights for each separate environment if you want to be able to deploy to Acceptance and to Production.