Add a Custom Domain
Create a custom BYU subdomain, add a digital certificate
Overview
Here's how you use a custom BYU subdomain for your application; for example funstuff.byu.edu. This assumes you don't have a subdomain and digital certificate for that domain yet.
If you want to point an existing byu.edu subdomain to your Mendix application, see the FAQ below.
Steps 1 and 2 can be done by a BYU Computer Support Representative (CSR).
- Request a BYU subdomain and point it to your app CNAME.
- Request a digital certificate for your BYU subdomain.
- Upload the digital certificate to Mendix.
- Add the digital certificate to the application server.
- Set the ApplicationRootUrl runtime setting in Mendix.
- Reconfigure SAML to tell CAS about the new custom domain.
- Save the digital certificate in a secure place.
Browse the FAQ section below for answers to common questions.
1. Request a BYU Subdomain
You can ask a CSR to do this or fill out the BYU Hostname Registration form yourself.
- Select Aliases (C Name).
- The DNS Name will be your application's custom domain name with .cname.mendix.net appended to it; for example the DNS name for "funstuff.byu.edu" would be "funstuff.byu.edu.cname.mendix.net".
- The Aliases will be your custom domain; for example "funstuff.byu.edu".

Note: if you are pointing an existing subdomain to the Mendix application server, you fill out the same form and include a comment indicating that you're pointing the existing domain to the Mendix application server. See "Point Existing BYU Subdomain to Mendix Application Server" in the FAQ for an example.
2. Request a Digital Certificate
Unless you have access to DigiCert with a BYU account you will have to ask a CSR to do this. If you are in BYU OIT, try the Technology Support channel of the IT Collaboration team. You may be referred to the KB article below:
KB0031642 How to Use DigiCert and Related Tools
See also Mendix documentation: "Obtaining a New Signed Certificate"
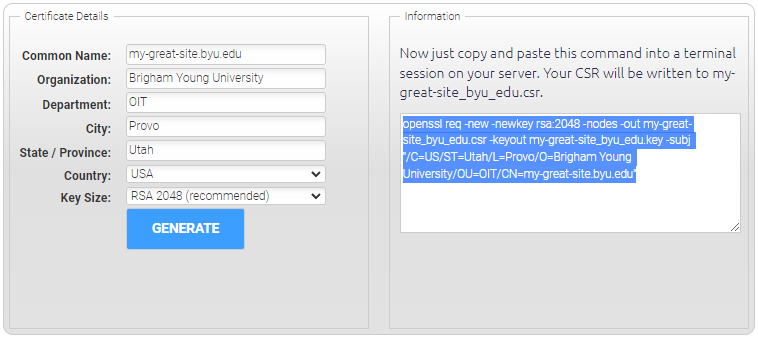
If you do this yourself, you need to create a certificate signing request (CSR) for the custom domain to upload to DigiCert when you request the certificate. Try using the DigiCert OpenSSL CSR Wizard and fill in the fields like this:
Common Name: (custom domain name, for example my-great-site.byu.edu)
Organization: Brigham Young University
Department: OIT
City: Provo
State / Province: Utah
Country: USA
Key Size: RSA 2048

Click on Generate and copy the generated OpenSSL statement.
Paste it to the command line in Windows, Mac OS, or Linux and run it to create a .csr file and a .key file. Keep the .key file private.
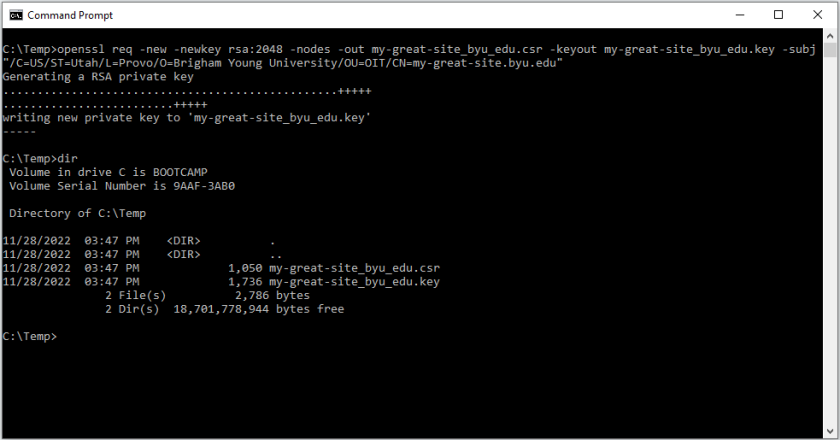
Upload the .csr file to DigiCert to initiate the request.
You will receive an email from DigiCert with a .zip file that has two .crt files for the custom domain's public key (certificate) and the Certificate Authority (CA) certificate. You will upload these to Mendix in the next step.
3. Upload the Digital Certificate to Mendix
- Go to the Mendix Developer Portal for your application and navigate to Environments.
- Under the Custom Domains tab, select New to add a certificate.
- Choose "Upload Certificate, Chain and Key" under "Upload My Own".
- Give it a description, like the custom domain name; for example "funstuff.byu.edu"
- Copy from your certificates into the TLS Certificate, Intermediate Certificate Chain, and TLS Private Key fields.
The TLS Certificate for the domain "funstuff.byu.edu" is usually named funstuff_byu_edu.crt.
The Intermediate Certificate from DigiCert is usually named DigiCertCA.crt.
The TLS Private Key comes from the private key file that was created and used to generate the certificate signing request that was sent to DigiCert to generate the digital certificate. If you created it, copy it from your private key file. This file should be kept secure and not emailed or posted in a public place. If a CSR generated it, get the private key file from the CSR.
Consumer Safety Tip
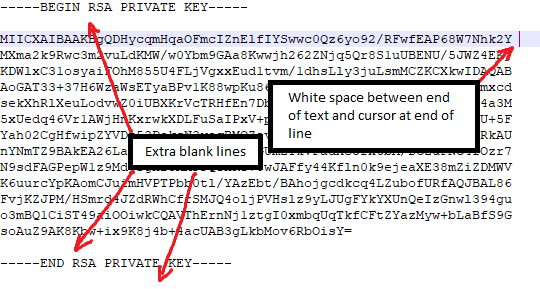
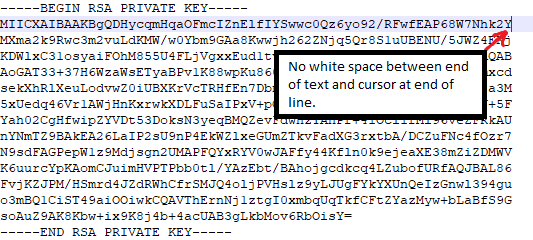
When you copy and paste certificates, be sure there is no extra white space at the ends of lines and that there are no blank lines. It's best to use a plain-text editor to open the certificate to copy it, like Notepad. See the Troubleshoot Certificates section below for more.
See "Uploading Your Own Custom Domain Certificate" on the "Custom Domains" page at Mendix for more.
4. Add the digital certificate to the application server
1. Select the Details button for the environment you will add the certificate to; usually Production.
2. Navigate to the Network tab.
3. Select the Add button under Custom Domains.
4. Enter the domain name; for example "funstuff.byu.edu"
5. Select the certificate you uploaded from the dropdown and Save.
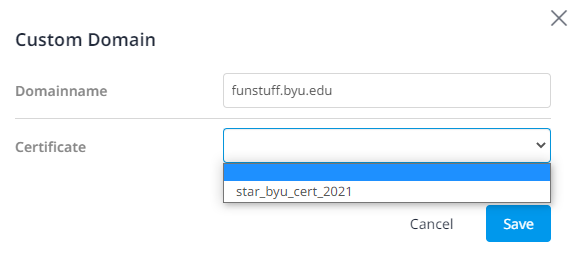
The certificate should work now. You do not have to restart the server.
5. Set the ApplicationRootUrl Runtime Setting in Mendix
In the Mendix Developer Portal for your application, navigate to Environments and select Details for the environment you are adding a custom URL to.
- Select the Runtime tab.
- Under Custom Runtime Settings, select Add.
- Setting: ApplicationRootUrl
- Value: the URL of your custom domain, including "https://"; for example "https://funstuff.byu.edu"
- Select Save and restart your application for the setting to take effect.
See here for Mendix documentation.
6. Reconfigure SAML to Tell CAS About the New Custom Domain
When you change the application's URL, you must always update CAS with the new URL. Do this in the SAML module then send the updated SP Metadata in an email to ops@byu.edu.
Important: you must set the ApplicationRootUrl runtime setting and restart the server (above) before you go into the SAML Settings page and update the SP Configuration.
See Create a Security Provider (SP) metadata file on the BYU CAS Single Sign-On page.
7. Save the digital certificate in a secure place
When you upload the certificate (see above) it is stored securely on a server in the Mendix Cloud.
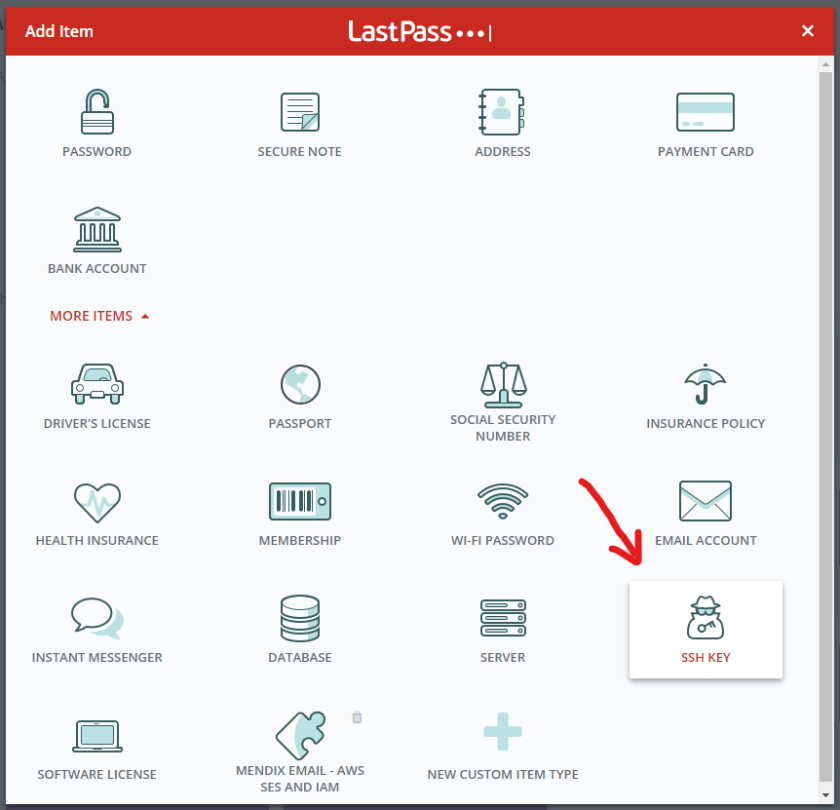
When the certificate expires someone will have to renew it. They will need the original certificate signing request information. Save this in a secure place that other team members can access. Here's how to do it in a shared LastPass account.
1. Add an item

2. Select MORE ITEMS to show all of them and select SSH KEY
3. Fill in the fields like this. Open the private key (.key file), the certificate (.crt file), and the certificate signing request (.csr file) and copy and paste them into the fields. In this example, the certificate (.crt file) goes in the Public Key and the certificate signing request (.csr file) goes in the Notes.
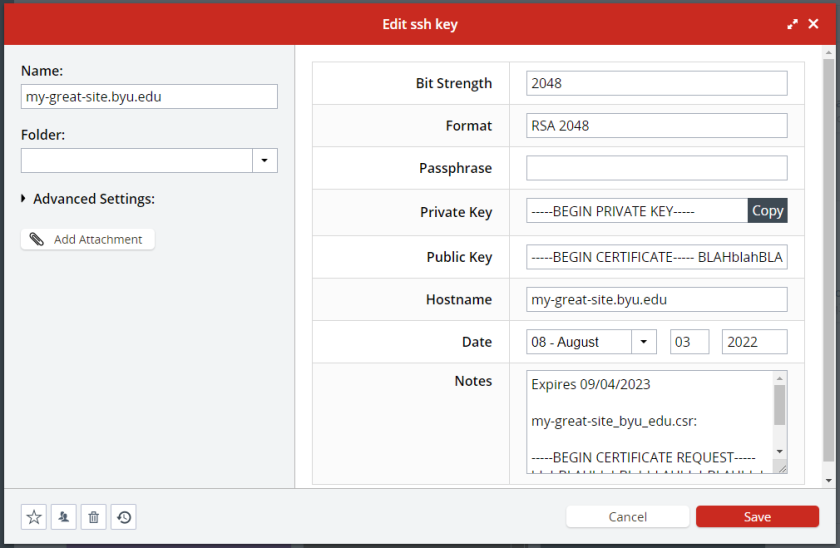
4. Put it in a folder shared with other administrators so others can renew the certificate in the future if needed.
How do I use an existing custom domain?
- Contact the manager of the custom domain and get the digital certificate for the domain.
- Upload the digital certificate to Mendix.
- Add the digital certificate to the application server.
- Set the ApplicationRootUrl runtime setting in Mendix.
- Reconfigure SAML to tell CAS about the new custom domain.
- Request a modification to the existing DNS entry to point to your application's custom domain.
How do I point an existing BYU subdomain DNS entry to my Mendix application?
Fill out the same BYU Hostname Registration form (see also 1. Request a BYU Subdomain above) and include a comment indicating that you're pointing the existing domain to the Mendix application server.
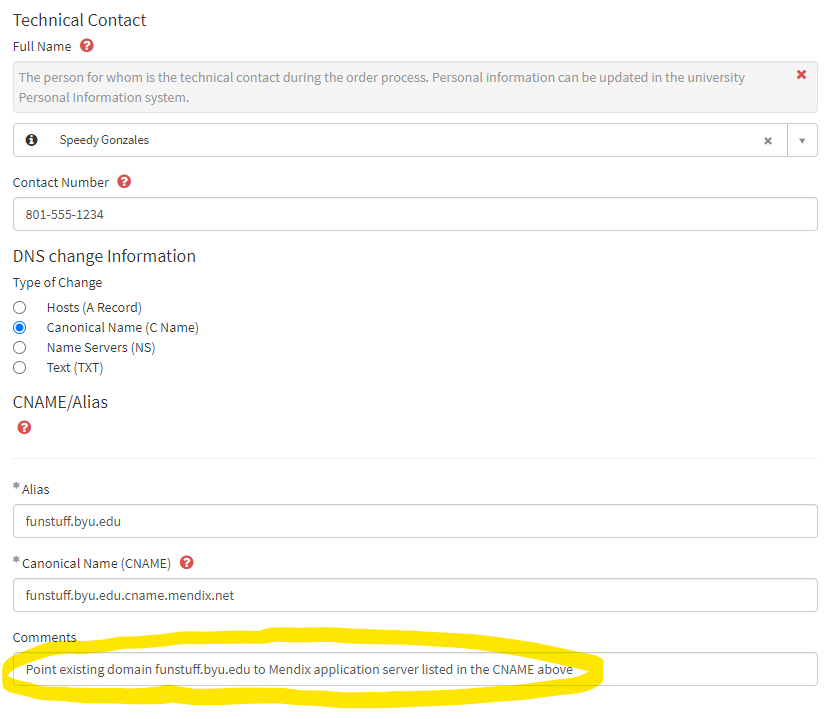
- Select Aliases (C Name).
- The DNS Name will be your application's custom domain name with .cname.mendix.net appended to it; for example the DNS name for "funstuff.byu.edu" would be "funstuff.byu.edu.cname.mendix.net".
- The Aliases will be your custom domain; for example "funstuff.byu.edu".
Troubleshoot Certificates
If you get an error when you upload a certificate, check that there are no blank lines in the certificate and that there are no white spaces at the end of lines.
Good:
Bad: