BYU CAS Single Sign-On
Set up single sign-on with BYU CAS
Overview
CAS only works for applications running on a server on the Internet. You can't use it with your Mendix application running on localhost.
The ability to use the BYU Central Authentication System (CAS) to sign in to your Mendix application is included in the BYU Starter App but it requires configuration of both the API and the Mendix SAML module to set up single sign-on with BYU CAS. Setting up SAML and CAS takes only a few minutes. Getting an API key, a service account, and a Data Sharing Agreement to access the BYU Persons API takes longer and you will have to wait for approval of the Data Sharing Agreement.
- Sign in as Mendix Administrator
- Configure API key to access BYU Persons API
- Synchronize entities in the Model Reflection module so the SAML module can use them
- Create a Security Provider (SP) metadata file and send to ops@byu.edu
- Configure the Identity Provider (IdP)
- Email sp_metadata.xml to ops@byu.edu
See the Troubleshooting section at the bottom if you encounter problems.
1. Sign in as Mendix Administrator
Before you can sign in, you will have to set the password for the administrative user (usually MxAdmin). You can't use the simple password for the administrator that you used when running locally. The process to set the password differs depending on whether you are running on a free node (*-sandbox.mxapps.io) or a paid node (*.mendixcloud.com).
When running on a Mendix Cloud server, either a free or paid node, the "Sign in" link in the upper right always redirects to a CAS login. Since CAS isn't configured yet, you can't sign in this way. You will get a "404 Not Found" error.

Instead of signing in to CAS with your BYU user name, you can sign in to the Mendix login page as the administrative user by appending "/login.html" to the root server name in the address bar; for example "https://mygreatapp-sandbox.mxapps.io/login.html".
Free node: set administrator password
In Studio Pro, set the administrator user name and password in the Administrator tab of App Security in App Explorer.

Follow the password requirements listed in the Password policy tab.

Click the "Publish" button (top right in Studio Pro) to publish the password to the app running on the free node.
Paid node: set administrator password
- Locate your app in the Mendix Developer Portal.
- Under Environments, click the Details button for the environment you are working on (Acceptance or Production).
- Select the "Change Admin Password" button to set the password for the administrative user.

The default administrative user is MxAdmin unless you changed it in App Security in Studio Pro. Follow the password requirements set in the "Password policy" tab. See Free node: set administrator password (above) for details.
2. Configure API key to access BYU Persons API
This requires you to set up an application in the BYU API manager, subscribe to the Persons API, generate a unique API key, request a service account, and submit a data sharing agreement (DSA) request for the data in the Persons API. Your part doesn't take very long but you will have to wait for approval of the data sharing agreement. Go to this page to learn how to do it:
3. Synchronize entities in the Model Reflection module
The SAML Settings module needs to be able to read the entities in your project. You make them available by using the Model Reflection module.
Sign in to your application as the administrative user (step 1 above) and navigate to the Model Reflection page under the Admin menu.
Select the checkbox next to the BYUAccount module and select the Click to refresh button on the right to retrieve the entities and microflows for the BYUAccount module. You should see the BYUAccount.Account entity (outlined below).

4. Create Security Provider (SP) Metadata File
Sign in to your application as the administrative user (step 1 above) and navigate to the SAML Settings page under the Admin menu.
Select the SP Configuration tab and fill in the fields. Most of the fields are just for information but there are a couple that are important for CAS to recognize your app and communicate with it.

- Unless you have set up a custom URL to access your app, for example "https://funstuff.byu.edu", leave "Use a custom entity Id" set to No. The root URL for your app should already display under the Entity Id. If it doesn't, select the Refresh button to read the URL for your app into the Entity Id. If you use a custom URL see Add a Custom Domain for details on how to configure this, specifically the Reconfigure SAML to Tell CAS About the New Custom Domain section.
- Click the Save button. It won't close the page even though it saves your changes.
Note: if the root URL for your application does not match the Entity Id you set in the SP Metadata XML that was used to register your application with CAS, it will show "Application Not Authorized to Use CAS" when you try to sign in.

There are two common reasons for this. Either the SP Metadata wasn't registered with CAS or the Entity Id doesn't match the root domain URL of your application. Contact a Mendix administrator for help.
Step 5: Set an Encryption Key
Go to the application in cloud.home.mendix.com and select Environments. See the model options on the environment and set the EncryptionKey environment variable (Under Environment Details > Model Options > Constants). The encryption key should be a string of 32 random characters. You will also need to set EncryptionPrefix to {AES3}. After this is set, restart the environment. If you don't set the EncryptionKey, you won't be able to save your User Provisioning settings under the IdentityProvider (IdP).
6. Configure the Identity Provider (IdP)
In the SAML Settings page, select the IdP Configuration tab and select the New button to create a new identity provider configuration for CAS. It will launch a wizard with several popup pages and fields to fill in.
There are a couple fields that have to be entered exactly. Here they are so you can copy and paste. You will see them again in the instructions below.
- URL: https://cas.byu.edu/cas/idp/metadata
- Name: urn:oid:0.9.2342.19200300.100.1.1
- Friendly Name: uid
Here is an outline of the wizard pages and steps:
- A. Identity Configuration
- B. Attribute Consuming Service (skip this)
- C. Encryption Settings
- D. Identity Provider - Fetch Metadata
- E. Service Provider - Configure Request Authentication
- F. User Provisioning
- G. Toggle Active
A. Identity Configuration
- Alias: BYU CAS (or similar)
- POST_BINDING
- No, URL and response binding are communicated to IDP in SAML requests
- Assertion consumer service index: 0
B. Attribute Consuming Service (skip this)
- scroll to the bottom and click Next without making any changes
C. Encryption Settings
- Deselect "Enable better security for app." We don't use it.
D. Identity Provider - Fetch Metadata
- URL: https://cas.byu.edu/cas/idp/metadata
E. Service Provider - Configure Request Authentication
- There shouldn't be anything you need to change; just make sure it looks like the page shown below.
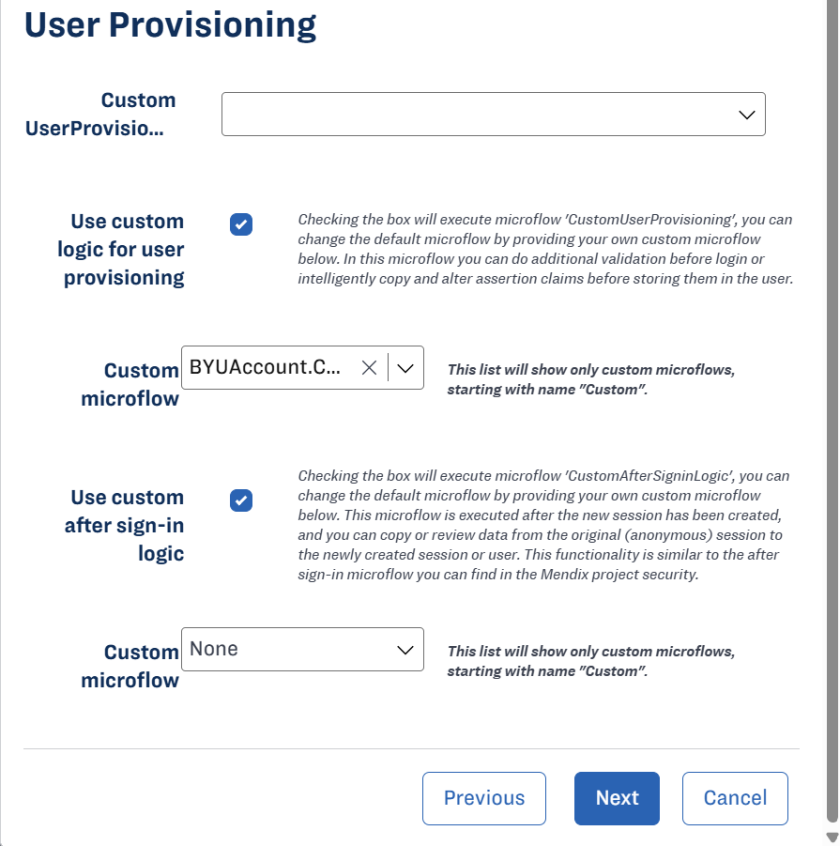
F. User Provisioning
The SAML module can assign a role to new users who have signed in to CAS but don't have an account in your application yet. This is handy if you want to grant a basic role to all new signed-in users, especially if you have hundreds or thousands of them you don't want to manage. Select Yes for "Allow the module to create users" and select the role you want to assign new users from the drop-down menu that displays.
If your application only has a few users and you want the administrator to always manage who can use the application, select No for "Allow the module to create users".
The SAML module has two microflows it can run after a user signs in to CAS and is returned to your application. If you built your application from the BYU Starter App, always select "Use custom logic for user provisioning" because we have customized the CustomUserProvisioning microflow in the SAML20 module to look up the user with the BYU Person API and return basic information about the user to be stored in the BYUAccount.Account entity.
If you want to customize the CustomAfterSigninLogic microflow, select "Use custom after sign-in logic" as well. Very few people use this microflow.
G. Toggle Active
Now that you've created an Identity Provider configuration for BYU CAS, you must make it active or it won't be used.
- Select the row you created and click the Toggle Active button.

You are done configuring the SAML module to work with CAS. Once the SP Metadata file you created in section 5 above has been sent to CAS and accepted, you should be able to use the Sign in button to sign in to your application with CAS.
7. Email sp_metadata.xml file to ops@byu.edu
If you overlooked the instructions above to download the SP metadata, you can go into the IdP Configuration and get it.
Under the IdP Configuration tab, select the configuration you created; for example, BYU CAS, and the Edit button (or just double-click on the configuration you created). Select the Download SP Metadata button and save the XML file it generates.
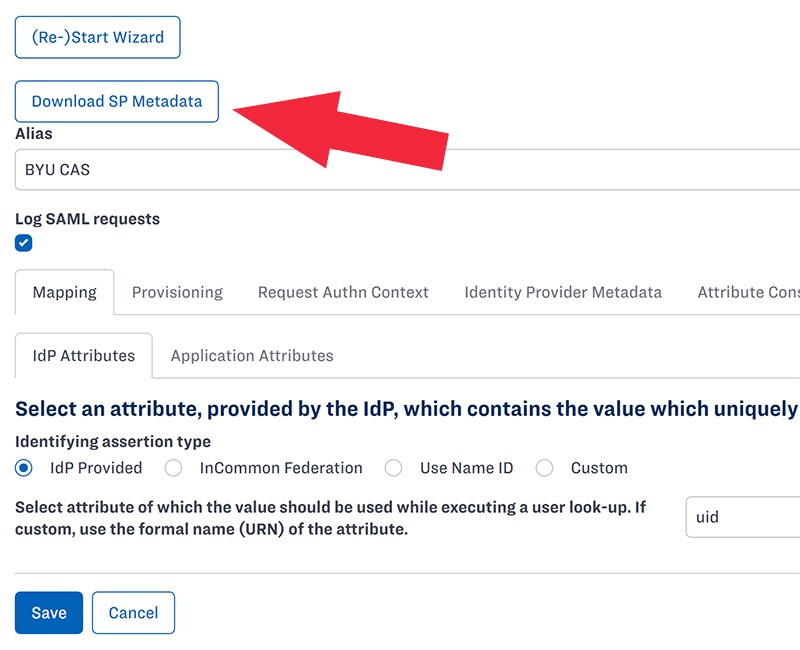
This is the file you will attach to an email to request that your application be added to CAS so it will be recognized by the BYU Single Sign-on.
Please include the following in the email:
- App name (for example, FunStuff)
- Environment (sandbox/free node, Acceptance, Production)
After sending your sp_metadata.xml file along the CAS administrators team runs a CAS sync every Monday to register your application with CAS. Work with the Operations Team if you need to expedite the process.
Any requests during the 3-week limited change period at the beginning and end of a semester will be postponed until after the limited change period is over. This minimizes the possibility of disruptions to critical services for students during final exams and the busy time at the beginning of a semester. It usually starts on Exam Prep Day at the end of a semester and ends the day after the Add/Drop Deadline at the beginning of the next semester. Please plan your requests for changes to CAS accordingly.
Troubleshooting
Error - A problem occurred parsing attribute 'Contents' of object of type 'SAML20.X509Certificate'
When adding an Identity Provider (IdP) this error occurs after entering the CAS metadata URL https://cas.byu.edu/cas/idp/metadata and selecting the Next button:
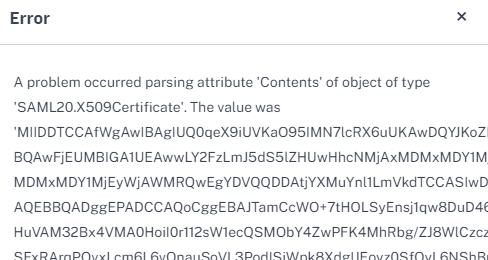
Workaround:
Option 1: Download this edited certificate file that has the white spaces and newline characters removed between the <ds:X509Certificate> tags.
Option 2: Fix it by hand yourself. Download the certificate from https://cas.byu.edu/cas/idp/metadata and remove the white spaces or newlines between the <ds:X509Certificate> tags and save it.
Once you have the edited certificate file, select No for "Read IDP metadata from URL", browse to the file, and select Next.

Error - The application hasn't been properly configured to support Single Sign On.
Check that the IdP configuration is active. If it isn't, select the row and press the "Toggle Active" button.
If it is active, edit the IdP configuration and check the Application Attributes tab and see if the entity is still mapped to BYUAccount.Account and the attribute to NetId. If they are blank, re-select them. If you can't reselect them from the list, navigate to Model Reflection and make sure the BYUAccount module is selected and press the "Click to refresh" button. See Step 3 "Synchronize entities in the Model Reflection module" above.