Mendix Academy
Mendix has Learning Paths on its website that will help you learn the basics of the program.
Note: The Mendix Rapid Developer Certification Exam will ask quite specific questions to test your knowledge. Pay close attention as you complete the Learning Paths and don't gloss over seemingly unimportant details.
NOTE: This learning path no longer exists. The notes below will be updated eventually. Skip this section. Everything is now in the "Build Your App Using a Template" Learning Path above which replaces the two older learning paths.
Time: ~2 hours
Link: https://academy.mendix.com/link/paths/83/Build-an-App-in-Mendix-Studio
Notes: The Learning Path will say to use Mendix Studio to complete the course. You should use Mendix Studio Pro instead. Due to this, there will be a few discrepancies between your program and the instructions. The rest of this page serves as a guide to help you complete this Learning Path.
2.2.1
When it references “preview” you want to click the green play button in the top right to run the app then click view app when it’s done. It will prompt you with a login for your new app. By default, username: MxAdmin and password: 1 will allow you to enter the app as an admin. You’ll learn more about how security and roles work later.
3.3.1
When it references “preview” you want to click the green play button in the top right to run the app then click view app when it’s done. It will prompt you with a login for your new app. By default, username: MxAdmin and password: 1 will allow you to enter the app as an admin. You’ll learn more about how security and roles work later.

3.4.1
For all the domain model changes you should be working with the domain model under the “TaskTracker” directory and not under System. The details for creating an entity and their attributes are the same. The interface just looks different. Here are screenshots showing what pro looks like.
Step 2

Step 2-4

Step 5

Step 6
To make an association in Pro, drag an arrow from the SLAStatus entity to the Task entity.
3.5.1
Step 2
Use the screenshot below to help you connect the data source to your list. Afterward, it will prompt you to autofill the list view. Say yes. Afterward you can delete the leftover title and you’re ready to move on. Note the design tab in the top right will give you a better idea of what your list will actually look like.

3.5.2
Do these before you start this section:
Before you can preview your page again you need to take care of any leftover errors. At this point you should only have one that says “At least one allowed role must be selected…”
This error exists because Mendix allows you to create pages that only certain roles can view. By default, the three main roles are Admin, User, and Anonymous user. This application uses “manager” and “user”. You can make your own custom roles and pages.
Right now, there are no roles that are allowed to see the page you made. We need to change that. On the left Under “TaskTracker” select security. Select the Page access tab. Check manager and user to allow them access to the page you created.
Now we have four more errors! Just as pages only give access to certain roles, entities also have security to only allow certain roles to view or edit them. To fix these errors:
- Select security
- Go to entity access tab
- Select SLAStatus entity that you made
- Check Manager and User
- Check Allow creating new objects and allow deleting
- At the bottom, set all to Read, Write
- Click OK
Now all the errors should be gone and you can use the green play button to view your app and continue the training.
4.2
If you change the page view to design mode in the top right it will look more like the pictures in the course
Step 1

4.2.1
Step 6
To set the true and false directions after a decision you can right click the arrow and set the condition value to true or false.
Step 14
When setting the enumeration value you can use Generate on the right side to easily select which enumeration you want.
On both change object activities, make sure you select Commit and refresh in client. This saves your object to the database and updates the objects in the webpage.
5.1.1
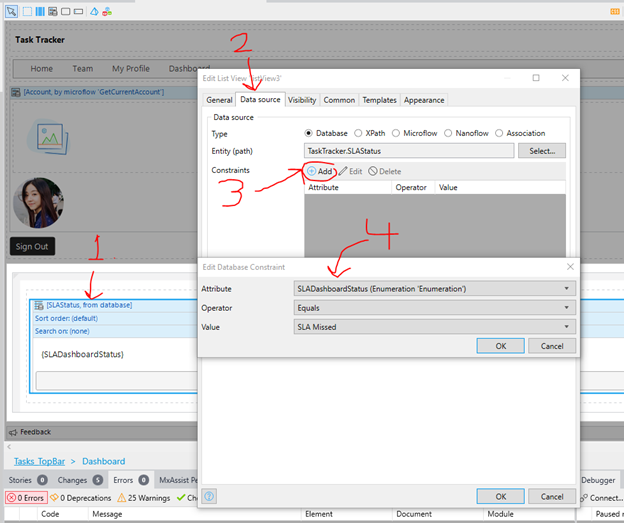
Adding the filter looks different in the pro version. Rather than adding a filter like it describes you need to add a constraint to the data that your list is receiving.
- Select the list view
- Select the Data source tab
- Add a constraint
- Add the constraint options that Mendix Academy describes. you can see this in the screenshot below.